Depending on your workflow, there are multiple ways to open an image in RIP-Queue or Job Editor. In 12.2 software, there are three new options in the Open dialog in RIP- Queue and Job Editor (Figure 1):
- Copies
- Magnification
- Rotate/Mirror
Opening an image using RIP-Queue:
- Click the [Open] icon on the toolbar, or select File > Open from the menu. This displays the “Open” dialog (Figure 1).
- On the middle of the dialog, select the printer you want to use from the drop-down menu. If you have developed Quick Sets, select your Quick Set. If you have not, leave this setting as [Default]. Quick Set options that match those in the Open dialog will be prepopulated. Any changes you make to those settings in the open dialog will supersede the Quick Set settings.
- If you want to send your image to Job Editor, select the [Open in Job Editor] option (Figure 1)..
- On the left-side of the dialog, browse to your image, highlight it, and click [Open]. The image will open and move to the “Jobs Ready to Print” area.
Opening an image using Job Editor:
1. In Job Editor, click the Open icon on the toolbar, or click File > Open. This displays the "Open" dialog (Figure 2).
In the “Open” dialog, you will see some of the same options as RIP-Queue (Figure 1). You can also select the box to apply the same settings to this job as the previous job. (Figure 2)
You can create a job ticket for a job to add information such as Job #, company name, or customer names. [Job Tickets] allow you to more easily sort and record information about jobs (Figure 1 and 2).).
To create a job ticket, there are several methods for creating it.
Use “Open” dialog: RIP-Queue, Job Editor
- Click [Open] icon on the tool bar. This opens “Open” dialog.
- Select a job that you want to have and type job information on the [Job Ticket] area.
You can also create job tickets within the [Print] tab of Job Editor.
Use “Job Properties”: RIP-Queue
- Open the “Job Properties” dialog clicking
 icon or double click /right click a job (Figure 3).
 -
Click [Job Ticket] under the [Print] tree(Figure 3).
- Type your job information, and click [OK].
You can also create job tickets within [Advanced] option of "Edit Quick Sets".
You can set the rotation of the job before you print it in “Open” dialog of Job Editor. Select the degree rotation you want the job to be, then click [Open]. The job will be rotated the number of degrees clockwise. You also can rotate your image [Preview and Size] tab of Job Editor.
Opening an image using Job Editor:
- In Job Editor, click the Open button on the toolbar, or click File > Open. This displays the "Open" dialog.
In the "Open" dialog, you will see some of the same options as RIP-Queue (Figure 1) without the rotation option. Rotation can be done in Job Editor. You can also select the box toto [Apply the same settings to this job as the previous job] (Figure 2).
 Opening an image using Hot Folders:
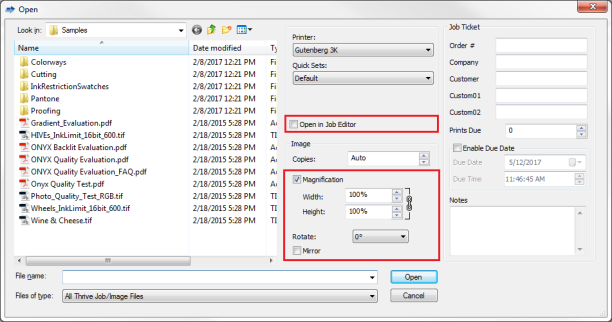
Figure 1

Figure 2

Figure 3